Last weekend I ran the second half of A1 (the sewers part) for a group of friends and coworkers as a test run for TotalCon. We had a good time, and I definitely feel like I learned a lot about that module. I chose this one because I felt it was the one with the most interesting and varied terrain, and wanted to see if we would get to a point where the players really wanted to use a battle-mat, which will of course inform me as to whether I need to bring one to TotalCon. The answer: no, just about every player seemed to appreciate using description and my typical miniatures for marching order and grouping only.
Once everyone left and I was cleaning up, I was delighted to find that one of the players had doodled all over the back of her character sheet. It amounts to a sort of pictorial record of their adventure, and after getting permission from the author I thought I’d share it. Here it is (click to see it larger):
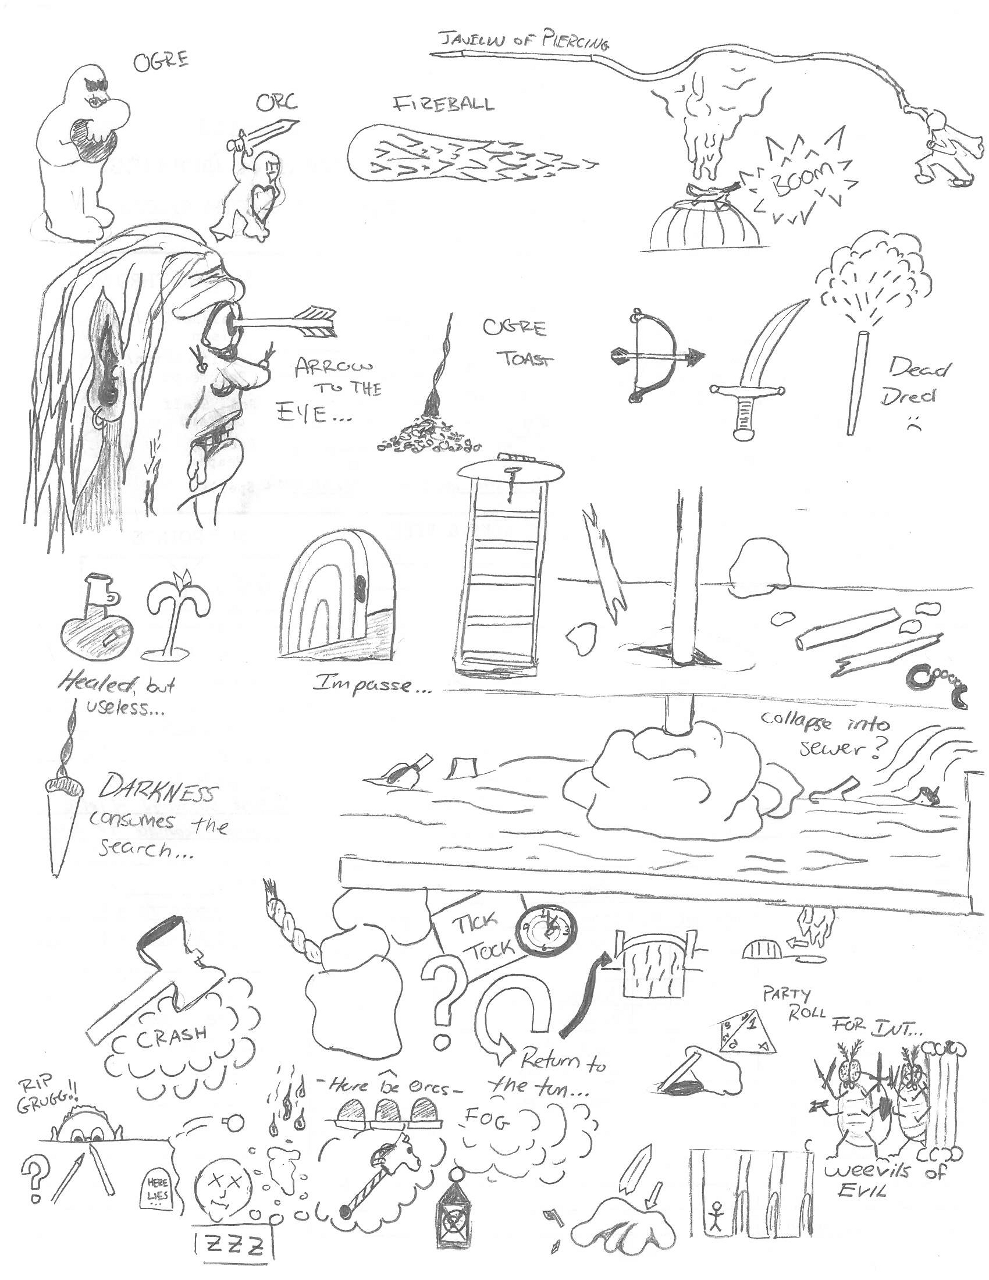
 To accompany the art, here’s a description of how the adventure went. Those of you with A1 in hand may want to get out your map of the sewers and follow along. There will likely be some spoilers here, so if you think you will play this module (especially if you’re signed up to play one with me at TotalCon), you may want to turn back now:
The players started out extremely well, being very careful about the garbage pit, prodding it with spears, etc. Once discovering that the garbage would burn them, they used a spider climb to create a rope line across and completely avoided the encounter. Well done players.
Then things started to go poorly. Elwita (the dwarf warrior in full plate) hit the trap that flung her into the sewers. Some brave actions from her companions diving in with ropes managed to bring her back to the surface and even fetch up all her lost gear, but at the expense of some nasty drowning damage to a few players, especially Elwita. Next the players proceeded north to investigate the booming tun, wasting some valuable time but fortunately not disrupting the noise-maker and thus alerting the guards to their presence. They then turned back south, took the southern-most passage, and came upon the orcs and ogres.
Here’s my first major screw-up where I encountered the issue of number of attackers fighting side-by-side in a 5′ wide corridor. As mentioned in a previous post, I went with just one and adjusted the number of attackers they were facing. The party struggled with this one, wanting to try and hit their attackers with a fireball but having trouble due to the cramped quarters. This tactic became a point of argument amongst the players, and frankly had I been on the other side of the table I probably would have also argued against use of the fireball. They eventually figured it out though, and managed to take out one of the ogres and a couple orcs, though given the numbers they faced it seemed like a pretty weak use of the wand. In the meantime, the back of the party got attacked by six orcs and an ogre, where they made much more effective use of color spray, knocking out 5 of the orcs. The javelin of piercing took out the ogre, and the remaining orc was charmed. So kudos to the rear-guard on that one.
With only the reserves left in the room (1 ogre and 6 more orcs), the party backed out. The reserves likewise held back in the room watching the entrance for intruders. The party then cast invisibility on Dread Delgarth and sent him forward with his remaining fireball. He got all the way to the entrance of the room where I drew out the dimensions of it for him and the placement of the orcs and ogre. I don’t use volumetric fireballs (too much hassle), but I did point out that the entire width of the room was only 20′. I didn’t want to out-right tell the player where to put his fireball, but ultimately this meant aiming at any target other than the very back wall would cause him to get caught in the explosion radius. Unfortunately for Dread he aimed for the ogre, failed to save against his own spell, and died. Good news is that he also took out all the enemies. The party moved forward, used their Raise Dead scroll on Dread, who then insisted that they not waste further power on him and played the rest of the game with just 1 hitpoint.
Next the party entered the area with the collapsing ceiling and this was their downfall. They simply could not figure out how to get past the blockage, though they did send Blodget through to scout. They then spent a lot of time backtracking and searching for secret doors. They decided to try tying a rope around the support and pulling it out, which of course completely blocked their forward progress. They insistently checked out the false trap door in the previous room, sure it could not be the red herring it actually was. After a long amount of real time, they returned to the blockage and Ogre’s player in frustration approached the fallen block and banged his head against it and tried gnawing it with his teeth. I decided to give them one clue, and told Ogre’s player “you think you could probably get your fingers under it to lift it.”
This is what they needed. Suddenly ideas poured forth, pretty much every idea covered by the module. They were ready to use a lever but ended up just letting Ogre hoist the thing while they shored it up with flat rocks and more beams. Finally they were past the trap.
Against the orcs in the next tunnel they did better than the previous encounter. After getting hit with the poison gas bottles and having both Ogre and Kayen get knocked out, a well placed Hold Person on the shaman and Wall of Fog on the archers prevented further harassment from that side. The party then focused on flushing out the remaining orcs on their own side, leaving archers to cover the foggy bank should the fog dissipate. Amusingly the as we went around the table Ogre and Kayen (the artist of the picture above) would describe the crazy dreams they were having from the poison gas. Finally when that wore off the party started moving forward, but then the fog dissipated. They were harassed by bow fire, and though they took out most of their attackers, a well placed shot killed the 1 hit point Dread. They pushed to the door, flung it open, and entered the room full of gas… with a torch.
Boom! Actually the damage from this wasn’t so bad, only 4 players had made it into the room yet, and were able to absorb the damage. Time was running out so the party pushed forward quickly, entering the room of slave pits. They faced off against the aspis drones and were actually doing reasonably well. Only Blodget was knocked into a pit, but a well placed Paralysis and Suggestion (Fall!) knocked both of the drones into the pits. The suggested one was climbing out to continue the fight when time ran out.
Just one room shy of the end! Though the party had blown a lot of their more powerful magics, so the end fight might have been difficult for them. All in all I think they did pretty well. My only suggestions would have been to move faster (no reason to stick around fighting when you can move on) and to let the fighters do their jobs a little more (they could have taken more of those orcs and ogres on without the fireballs).
I’ve added their score to the list, and currently their in front with a score of 355 out of a possible 405. I’m quite eager to see how the players at TotalCon do.


That picture is crazy awesome!
And it’s a heck of a thing when players are literally banging their heads against an obstacle. (As I also experienced running S1.) I approve of what you did here.